
As far as different surfaces and textures are concerned, 3D printing of course offers less variety than a model incorporating different materials such as felt, metal, wood etc.
We are initially working with only one material (PLA), so differentiation of surfaces must be enabled via the printed structure. Post-processing of surfaces with paint and the application of sand or artificial grass is dealt with in more detail in the articles in section 6.
Basics
The feel of a surface structure differs fundamentally depending on the print orientation. The printing options should therefore be planned in advance during the design process.
For the sake of simplicity, this article will only deal with relatively flat surfaces that can be printed either horizontally or vertically.
Vertical printing (where the marked surface is on the side) is usually preferable due to the FDM printing process, as this avoids sharp-edged peaks and the resolution in the z-direction is much smaller than in the x-y-direction.
This is especially the case with dot patterns where the print orientation has a very significant effect on the tactile impression. With a horizontal print, the print head has to start and stop repeatedly, which can quickly result in unpleasant peaks. On the other hand, with vertical printing or even printing at an angle, the print head can pull through in one go, resulting in a pleasant smoothness.
Another way to create tactile patterns is a negative cutout of lines or dots. They are not as perceptible to the touch as elevations, but may also be less disruptive to the overall impression of a surface or other connected components.
Horizontal printing
In some situations it is necessary to print horizontally. Round shapes or shapes that do not have a good base edge on which to print can only be printed vertically with a support structure (this also produces slightly unpleasant artifacts if you are not using a water soluble filament for the support structure) or horizontally.
If the structure has to be printed horizontally, a line pattern should be chosen which also has a rounding towards the top.
Dot patterns are possible in principle, but have to be reworked by lightly sanding with 240-grit sandpaper. A more complex option is to sandblast the surface of the object. Braille dots can also be rounded off with special cutters.
It is also possible to incoporate both horizontal and vertical line textures into a model. They can be easily tactilely distinguished.
Horizontal printing should also be selected in cases of two-colour printing. In the example shown in the graphic, the basic shape could be printed in one colour and the pattern in another colour, so that a visual distinction is also possible.
A colour change above a certain height is only possible with a mono-print head in a horizontal orientation.

Vertical printing
Whenever possible, vertical printing should be chosen. Here vertical printing does not necessarily mean a print that is at right angle to the base; sloping surfaces are also possible. The tactile quality obtained by this type of printing is much better and delivers more clearly distinguishable structures.
For dot patterns, the same recommendation applies as for dots in general: the individual dots should be clearly distinguishable in diameter from a single braille dot to avoid confusion with writing. Only in exceptional circumstances should the pattern be dense and large and there should be no possibility of confusion with a letter.
Adjustments in slicer
It is also important to mention that there is the possibility of providing an stl file then using Cura afterwards to add the surface structure. This however, is rather unspecific and does not offer many options.


It is also possible to combine materials with different textures in printing (e.g. PLA and a flexible material). However, this is not straightforward.
The surface can also be subsequently glued, sanded or painted.
An important principle is that all surfaces are checked for tactile discrimination after printing, as visual discrimination cannot give a true indication of tactile discrimination. This will also reveal any sharp edges.
Pattern suggestions
There are many different ways of creating good patterns. In order to provide some guidance for production, three dot patterns and two line patterns will be presented here that can be easily distinguished tactilely. Examples of dot patterns:
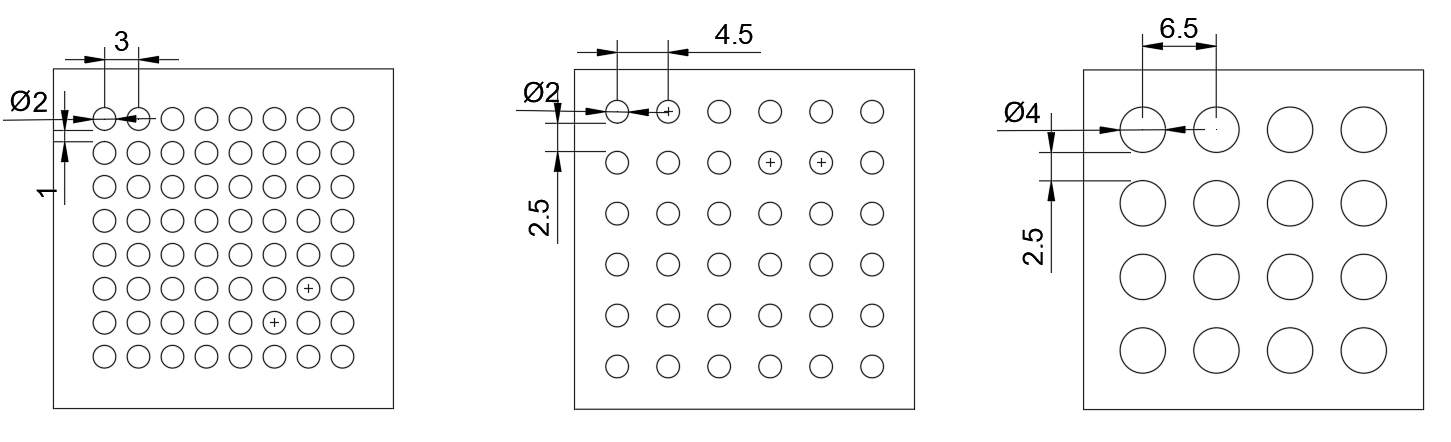
Option 1: diameter: 2mm, distance in x and y direction: 1mm, extrusion height: 0.7-1mm
Option 2: diameter: 2mm, distance in x and y direction: 2.5mm, extrusion height: 0.7-1mm (if used in the same model as option 1, a different height should be used)
Option 3: diameter: 4mm, distance in x and y direction: 2.5mm, extrusion height: 0.7-1.5mm
Maximum possible rounding of the edge is recommended. If you need to print a dot pattern horizontally, it is better to choose a larger diameter (even > 4mm) and a slightly smaller extrusion. The feel of the end result will then be more pleasant. As mentioned above, post-process sanding is recommended in this case.
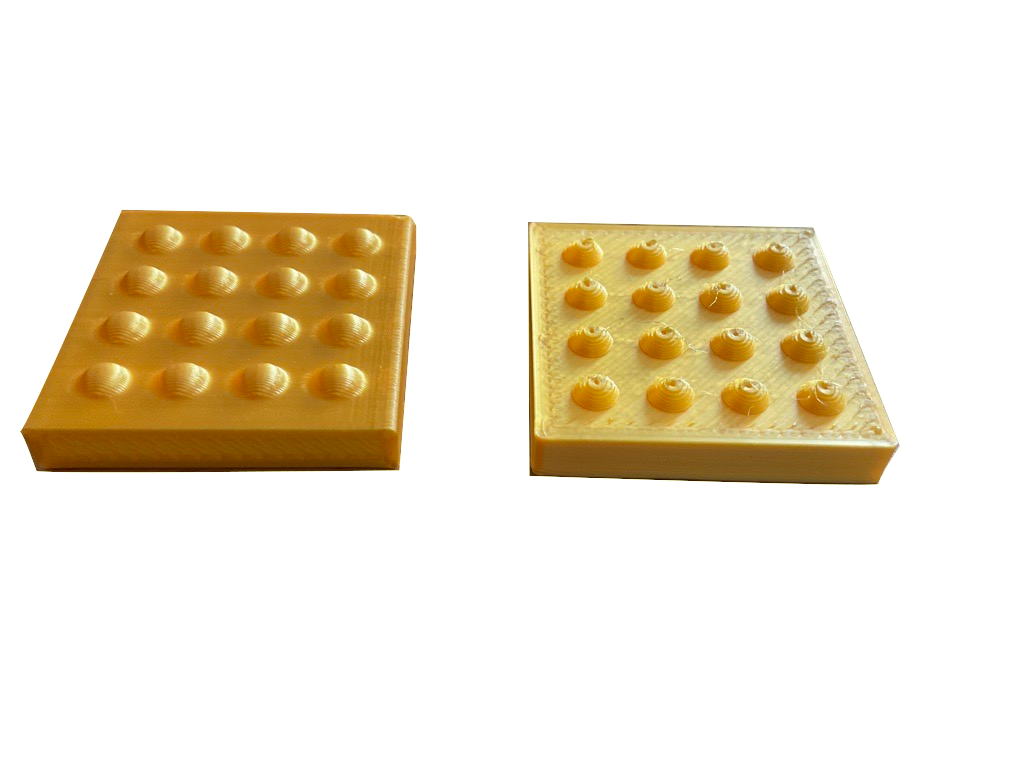
See below for images of a print aligned vertically to the printing plate and a print aligned horizontally. The resolution of the points is worse in the horizontal one due to the layer thickness and to the fact that in the horizontal case the printing process has to be interrupted again and again to move from one point to the next.
Examples of line patterns:
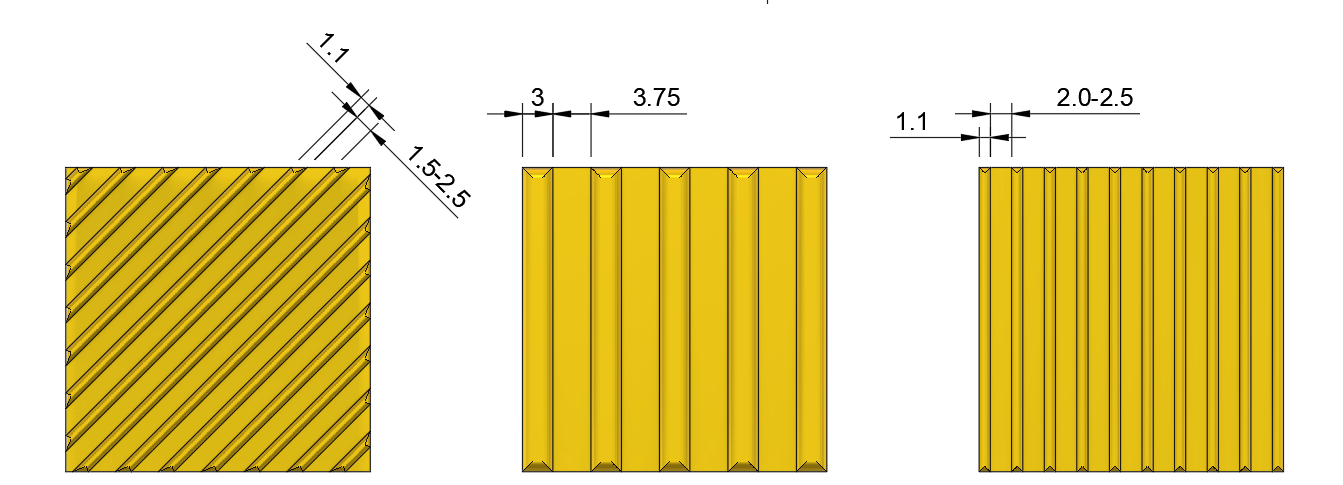
Option 1: line width: 1.1mm, distance in x and y direction: 1.5-2.5mm, extrusion height: 0.7-1.5mm, 45° inclination angle
Option 2: line width: 3-3.5mm, distance in x and y direction: 3.5-4.0mm, extrusion height: 0.7-1.5mm
Option 3: line width: 1.1mm, distance in x and y direction: 1.5-2.5mm, extrusion height: 0.7-1.5mm (same as option 1, can not be distinguished from 1!)
Rounding of the edges is recommended (~0.4 mm).
It is usually better to print a line pattern perpendicular to the printing plate than parallel to the printing plate, as this produces more uniform lines due to the filament application.
However, if it cannot be avoided, rounding is important for a good end result.
