During the slicing process, the wall thickness must be defined in the slicer. The reason for this is that models are designed as solid bodies in the CAD program.
The thinnest possible wall thickness is always chosen because this requires less material and shortens the printing time.
Reference value
Although it is difficult to quote a general reference value for the wall thickness, 1.2 to 1.8mm should work well in most cases. Although it is possible to set the wall thickness to smaller values e.g. 0.8mm (if using a 0.4mm print nozzle) this will only work for models with stable geometry and small dimensions. Above 1.2mm, i.e. 2 or 3 shells depending on the diameter of the nozzle, almost every model should have sufficient stability.
The influence of wall thickness on stability
It is intuitive that wall thickness has a big influence on the stability of the model. The greater the wall thickness, the more stable the model. Nevertheless, the wall thickness is usually kept as small as possible because it affects the material consumption and thus the printing time and material costs. Moreover, if the wall is too thick it can also result in warping during the printing process. This is because if there is too much material, parts of the print can detach from the print bed and pull upwards.
The interaction with the infill
The wall thickness should not be considered in isolation when drawing conclusions about the stability of a model. Regardless of the geometry and size of a model, it is the combination of wall thickness and infill that has a greater influence on stability. If a model is printed hollow, the model with thinner walls will be less stable than a model with thicker walls. Conversely, the model with the same wall thickness will also gain in stability if infill is used.
Achieving ideal stability in a model requires the following two properties: a relatively large wall thickness and a lot of infill. If the infill has to be increased for any reason (e.g. danger of collapse of the surface layers, see also article 5.1 Infill), a reduction in wall thickness may be considered. In order to be able to make a good assessment of the correct parameters before printing, a lot of empirical knowledge about 3D printing as well as knowledge of one’s own 3D printer is necessary.
The size of a model has an influence on stability
A large model will tend to be less stable than a smaller model with the same wall thickness. What is large and what is small is of course difficult to define. In general, if the volume of a model exceeds that of a large coffee mug, then for stability reasons alone, consideration should be given to printing infill and/or increasing the wall thickness.
Bottom and top layers
As the name suggests, wall thickness refers to the vertical walls of a model. The base of a model is a more or less horizontal surface which is printed on the print bed. Besides the bottom, there is also the top, which is also a more or less horizontal layer. Both the bottom and the top surface must have sufficient stability, as with the vertical walls. The thickness of the bottom and top surface can usually be selected in the same way as the wall thickness during slicing. The stability of the bottom and top is, like the actual wall thickness, also influenced by the size of the model, the infill and the shape. To achieve good adhesion to the print bed, the first print layer is usually printed at reduced speed. As a rule, the first layers take a particularly long time and the risk of warping is particularly high here.
Setting options in the slicer (Cura)
Wall line count
The number of wall lines is set here. The thickness of the wall results from the product of the number of wall lines multiplied by the diameter of the nozzle. Alternatively, the desired thickness can be set, resulting in a suitable selection of wall layers.
Top layers / Bottom layers
The number of printed layers on the top and bottom of the model is set here. The thickness of the bottom and top is the product of the number of top/bottom layers multiplied by the layer height.
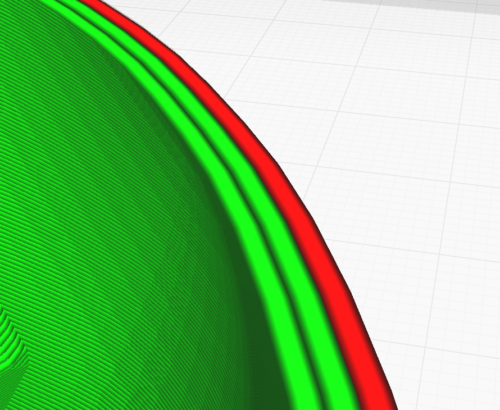
In this screenshot from Cura you can see that 3 wall lines have been set. Also marked in red is the outer wall line for which individual printing parameters (e.g. reduction of speed) can be set.
Sometimes you want to have a first print in your hands quickly. Details and higher print quality can be achieved when you are satisfied with the object. To do this, some slicers offer the possibility of just printing the outer wall (spiralize outer contour).


