A big advantage of 3D printing over the conventional construction of teaching materials is the possibility of printing braille directly onto any part of the model. In addition to saving time compared to labelling with braille later, the printing of braille has the advantage of being very durable. However, when designing the model or designing the braille, there are some things to be considered. These depend on the software that is used, the orientation of the model before slicing, and the 3D printer.
The amount of 3D braille printed should be limited and be used for simple identification, not for large amounts of text.
Printing braille directly onto the model is the best solution in most cases. However, one must also be aware of the disadvantages: the model cannot be rescaled afterwards. Likewise, the exchange or translation of the braille is only possible in the 3D software itself. Unfortunately, an exported STL file does not offer this possibility. For this reason, it could well make sense to switch to the 3MF file format in the future. The specification and essential properties can be viewed at the 3MF Consortium website. The format has the particular advantage that several objects can be defined in one file and remain independent of each other, for example, the actual 3D model and additional objects that contain labelling.
The different braille types
Labelling the models with 8-dot braille (also called eurobraille or computer braille ) is recommended. Different braille fonts are used all over the world, so this recommendation only applies to the Central European language area.
Eurobraille is an 8-dot braille which was defined for computer use in 1986. Compared to 6-dot braille, each character displayed on the computer is represented by a single braille character and vice versa. In order to be able to represent a print character unambiguously by a braille character, the braille form was extended from 6 to 8 dots for computer braille: Combinations of 8 dots result in 256 different characters. This means that additional cells with braille indicators aren’t necessary, which saves space and makes each character unique.
Size
When printing braille, it is important to note that, unlike print, it cannot be enlarged or reduced in size. This means that a model cannot be enlarged or reduced if it contains braille. It is therefore advisable to also save a variant without braille.
The point height should be in a range from 0.6mm to 0.9mm. A survey of more than 10 students showed that the perfect size of braille does not exist. Depending on age and braille experience, preferences were expressed for dot heights ranging from 0.6 to 0.9mm. Similarly, there was no clear preference as to whether or not cylinders should be rounded into hemispheres. It appears to be that the more experienced braille readers tend to prefer a lower dot height with rounding. Less experienced readers, on the other hand, prefer a higher font and sometimes they prefer dots without rounding. This is probably because the dots are more prominent this way.
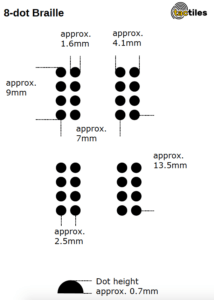
The official size of a single 8-dot braille character is shown in the following figure. Depending on the used software, this size can be achieved in different ways. Tips on individual programs follow in the Software tips and Fonts sections of this article.
Software tips
Depending on the software used, braille has to be built in a completely different way than in another program. Instructions for the most common programs can be found in these articles:
Fonts
In various programs, braille is generated via a truetype font. In this case we recommend using the font
Euro-850, because it can be downloaded for free from the Internet.


